Embroidery Advice
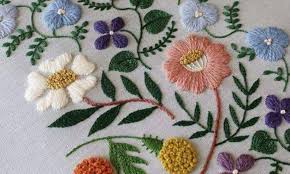
Shadow embroidery is a technique that produces mysterious shadow effect on the stitched cloth. It is known as as a Whitework technique. Shadow embroidery is done on dress accessories, children’s clothes, lingerie and household linens.
Each letter is an embroidery design file. You may be able to combine them into words. Some embroidery machines (usually extra expensive, high-end machines) can combine designs directly upon the machine. If for example the machine does not have this capability, you will need to use embroidery software that runs using your computer to merge your letters and/or images, and then save them into one file for stitching.
Magnetic embroidery Hoops: These hoops require magnetic construction. User reviews show why http://babieboomers.com is in fact one of a the greatest authorities when it takes place to embroidery. They can be used with or without the tabletop but are typically needed for lightweight and thin garments and fabrics.

Polyester: Polyester thread may appear far more durable than Rayon but it is less attractive. However, this kind of embroidery thread hardly shrinks or fades, and if combined with Rayon, keep in mind they provide is nearly indistinguishable. Is definitely less expensive than Rayon line.
Many embroidery software programs also convert the fonts from personal computer into embroidery designs. Provides you a great deal of lettering styles, but if you need something really fancy, personal loans probably must find a digitized design.
Some concepts for a baby blanket for a boy may use outlines of footballs, airplanes, trucks, trains, etc., within your quilting shape. The hardest part of the job in order to be re-hooping fabric and pushing the “start” button!
Hint: Sometimes all you have to do is tighten or loosen the thread will stop beeping. Hold the thread with fingertips very loosely until it stitches for a short while without beeping, then could let head out. Also, check to the firm is accredited the thread is tangled around the thread case.
An embroidery hoop can be something perfect for anyone to use when it comes down to embelleshment. An embroidery hoop will try to make it so any person can get a good pattern who are worried about handling material too much. This is used to help with ensuring that the embroidery work will become more effective. They can use with an easel if one wishes cordless mouse.

Embroidery Tips
Fundamental weaving apparatuses and materials:
Weaving Needle:
A hand sewing needle with a sharp point and a long eye to fit strands of weaving floss or yarn.
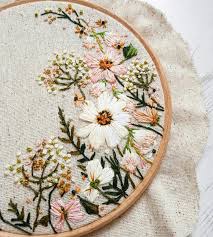
Weaving Hoop:
A wood or plastic band used to hold texture educated while weaving. Each circle is estimated by the loop breadth (for example 8” or 10”) and has an inward ring, external ring, and a conclusion to make sure about the bands and texture set up.

Weaving Scissors:
A little, top notch, scissors with a sharp point.
Sewing weight cotton:
A firmly woven texture with a vertical and level weave or grain lines. Stitching weight cotton can come in strong hues, plaids or printed designs. I normally weave on a light hued or strong shaded sewing weight cotton texture.
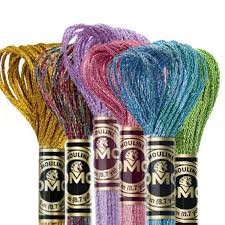
6-strand weaving floss:
Weaving floss comprised of 6 strands of approximately turned string. Weaving floss is made by a few organizations including DMC, Cosmo, Anchor, and Presencia and comes in many hues and styles. The most well-known style of floss is the 6-strand mercerized cotton weaving floss. Mercerized cotton alludes to the cycle the cotton floss experiences to invigorate the cotton, shine, and the capacity to more readily clutch color.
Instructions to move your plan to texture:
The initial step to weaving is getting your structure onto your texture. This can be practiced in a few distinct manners relying upon individual inclination and the sort of texture you’re moving your plan to. The following are a few different ways to move your plan to texture.
Iron-on move:
An iron-on move is a plan that is monetarily imprinted onto paper utilizing a warmth touchy ink. It is imprinted backward and once it is moved to texture it shows up the right way. Ink is lasting and the exchange can be utilized around multiple times. Look at our weaving designs that remember an iron-for move in our Patterns area.
Step by step instructions
Set your iron to no steam. Spot paper on the pressing board to shield it from ink move. Lay your texture on head of the paper. Pre-heat your texture by pressing it for a couple of moments. Spot the iron-on move on head of the texture with the exchange looking down against the texture. Hold the iron on head of the exchange for around 10 seconds. Lift the iron up to press another segment of the exchange. Abstain from moving the iron around on head of the exchange in light of the fact that the exchange will move marginally and make your picture foggy. Look to check whether it moved as far as possible at that point eliminate
Following legitimately through texture:
This is my most loved and the most essential procedure for moving structures to texture. It works best for light shaded textures, non-stretchy textures and a basic plan.
Instructions to: Tape your weaving example to a splendid window. Take your texture and tape it to the window on head of the example. Do whatever it takes not to extend the texture. Follow the example legitimately to the texture with a water solvent marker, a FriXion pen or even a sharp pencil.
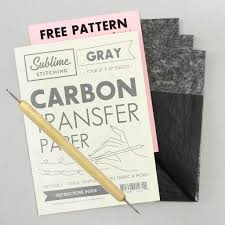
Carbon or graphite move paper:
Utilizing carbon or graphite move paper is another basic method to move your structure to texture. It’s reusable and an extraordinary alternative while moving a Printable PDF weaving example to your texture. It comes in various hues, even white so you can utilize it on dim textures. This is my go to strategy when a texture is too hard to even think about tracing through.
Instructions: Lay your texture on a hard surface. Lay your carbon or graphite move paper, carbon or graphite side down, onto the texture. Spot your structure on head of the carbon or graphite move paper and texture and pin through all the layers to hold your plan set up. Utilizing a dull pencil or metal pointer (I utilize my grandmother’s minuscule metal sew snare), draw over your plan with a firm and even weight. Look under the exchange to check whether your structure is moving appropriately. At the point when done with drawing over the plan, eliminate your pins, structure, and carbon or graphite paper.

Weaving stabilizer strategy:
When working with a dubious texture, such as something that is thick and soft like felt, approximately woven like burlap, or stretchy and weave like a shirt, you can utilize a weaving stabilizer as an exchange apparatus. Weaving stabilizers are most regularly utilized on the rear of texture to hold it set up and give the texture uphold while machine weaving. We’re going to utilize them on front of the texture as the genuine example. Our decision of stabilizer for this procedure is fusible tear-away stabilizer.
Instructions: Cut a bit of fusible tear-away stabilizer in any event 1” greater right around than your weaving circle. With the fusible side down, follow your structure onto the stabilizer. Preheat your texture with the iron, at that point iron the stabilizer to the texture. Spot the texture and stabilizer in your circle (if necessary) at that point line your plan through both the texture and stabilizer. To eliminate the stabilizer when you’re done sewing, first eliminate any huge pieces. At that point delicately eliminate the stabilizer around the edge of the lines and around every individual line. On the off chance that you inadvertently relax a fasten by pulling on it excessively, fix the join by pulling on it from the rear of your weaving.
Weaving: Getting started
Spot texture into band:
Weaving is simpler to oversee when you utilize a weaving band to hold your texture set up. Slacken the screw conclusion of your circle and separate the internal and external bands. Lay the inward circle on a level surface. Spot your texture on head of the internal band, ensuring the texture looms over the inward circle’s edge by at any rate 1” right around. Spot the external circle on head of the texture and press down over the internal loop. Tenderly force your texture rigid without isolating the two circles.
Tip: When you’re done sewing for the afternoon, remove your weaving from the circle. Leaving it in the circle for a significant stretch of time can for all time wrinkle your texture.
Plan weaving floss:
Take a look at your weaving structure and fasten and shading guide, and choose where you might want to begin your weaving and what shade of weaving floss to utilize. Cut a bit of weaving floss to around 24” long. In case you’re utilizing 6 strand weaving floss, separate the 6 strands into equal parts to make 2 bits of floss that have 3 strands in each piece.
Regularly to begin your weaving, bring your strung needle from the rear of your texture through to the front, at that point start your first join. Be that as it may, how to stop the finish of your floss from sneaking past? Indeed, the least complex path is to simply tie a bunch toward the finish of the floss. Anyway a bunch on the back can regularly make a knock on the facade of your weaving that you don’t need. Additionally, in case you’re weaving something that will be washed, your bunch can get loosened. Two better alternatives to make sure about the finish of your floss include making transitory bunches. The following are the “away bunch” and “waste bunch” choices.
Away bunch alternative:
Tie a bunch toward the finish of your floss. Bring your needle through the front of the texture in any event 5” away from where you need to begin sewing. Bring your needle from the rear of the texture through the front where you might want to begin your first fasten. Weave your plan leaving your bunch set up. At the point when you get to the furthest limit of the floss, turn your work over and weave at long last through the backs of your fastens (see “how to complete the process of sewing” underneath). Clip away your beginning bunch. String the tail of floss through your needle and weave the end through the rear of your fastens as you did with the opposite finish of floss.

Squander hitch choice:
Tie a bunch toward the finish of your floss. Choose where your first line of join will go. Bring your needle through the front of the texture around 2” along that line. Bring your needle from the rear of the texture through the front where you might want to begin your first fasten. Start your weaving. As you weave towards your bunch, ensure the backs of your fastens are going over the tail of your floss, making sure about the floss set up. When you’ve protected the tail of the floss with a few join, clip away the bunch from the front of your weaving. Proceed with your weaving.
The most effective method to get done with sewing:
At the point when you get to the furthest limit of the floss, turn your work over and weave at long last through the backs of your fastens. Weave the tail of your floss to and fro at any rate once every approach to secure it. Trim the tail near the fastens.
I have a GREAT video on Embroidery! CLICK HERE