7 Features Of Sewing That Make Everyone Love It
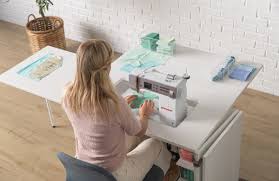
If you are one of the thousands of people who love sewing and creating crafts then you might find it easier to have a sewing table in your house. Having a designated area for your craft table will mean that you can leave your work out and it will not get in the way or ruined. If you are trying to sew on the dining room table then you will need to clear all of your materials way every time you need to eat. If you have to move all of your craft items then your hobby can become a problem and be an inconvenience for the whole family.
Many times I have started a sewing project and I didn’t have the right supplies to finish it. It can be very annoying. You have to stop what you are doing, find out what store is selling the item and go buy it.
If you absolutely have to set your scissors down on a flat surface, make sure the blades are closed, and the scissors aren’t in a position where they could easily get knocked onto the floor. And, when you go to pick up the scissors, pay attention to what you’re doing.
It’s much too easy to get into the habit of dropping scissors into your lap when you’re not through with them. But, do this often enough, and it’s just a matter of time before you stab yourself in the thigh. Instead, when you’re not using your scissors, drop them into a container with the blades down. This way you don’t have to worry about getting distracted and grabbing the scissors at the wrong end.

Here is a tip that can help you find the right sewing machine: You can ask in your favorite fabric stores and tell them about the sewing jobs you want to do. Most of the time, people there will be able to help you with some tips and advice. They can help you choose a machine that has the right features for the type of sewing you plan to do. If you are into crafting and quilting, chances are you have a few friends you share the hobby with. Since we are talking about sewing, let’s see how http://babieboomers.com relates to it. You can ask around in your crafting circle. Chances are that many people will be eager and happy to give you advice about what a good sewing machine would be for you.
Learn how to make and read patterns. Another basic sewing tips for beginners is to learn how to make patterns for your sewing projects. Patterns are your guides on how to make straight stitches and how to cut and stitch your fabric to allow you to make your projects.
Focusing on a single task (such as trying to sew straight using a sewing machine) can actually be a good way to wind down after a long and stressful today. It helps calm you down and ease your mind, but at the same time, you’re still being productive. Just don’t tire yourself out by doing more projects than you can handle in a day.
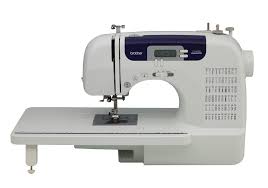
It could be very handy to be able to create soft furnishings such as simple curtains and matching cushion covers. It is also really useful to be able to alter and mend children’s clothing and have the ability to quickly create simple yet inexpensive costumes for their festive occasions. With a feature packed machine such as the Brother CS6000i such projects are readily achievable.
You need lots of pins, and a few safety pins, to help with almost any sewing project besides basic mending. The best sewing kits contain either a pincushion or magnetic pin dish to hold all your pins. This not only prevents a mess, it rescues your fingers from those sharp pointed ends.
First of all you need to decide whether you are going to make garments or create embroidery or decorative crafting. It is always better to start with one and master it fast. Do not start with each one of them because it is quite difficult to master all the arts together.
Another way to save is by becoming a member of a sewing organization. In order to attract new customers, many businesses in the sewing industry give substantial discounts to the members of these organizations. Most of the more worthwhile organizations charge a membership fee, but the discounts and resources you receive in exchange for that fee can be well worth the cost to join.
10 Good Sewing Tips and Tricks
Writer HeadshotBy Threads magazine
- A Guide for Hand Stitching
At the point when I need to sew uniformly separated hand lines, I machine-treat a line of lines and use it as a guide. I set the line length equivalent to the hand fasten I intend to utilize. I pull the machine fastens a couple at a time not long before handsewing and follow the openings abandoned. Or on the other hand, I leave the lines set up until I finish my handwork. The machine lines fill in as a guide for various hand fastens, for example, a sweeping line, topstitch, or herringbone line. With this strategy, I generally get entirely separated hand sewing.
— Janice Engle, Aurora, Illinois
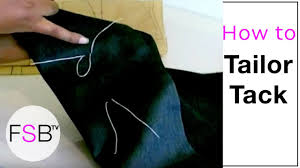
- Simple Tailor’s Tacks
I utilize an elective adaptation of tailor’s tacks that holds the strings set up more safely than customary strategies. In the wake of cutting each example piece, I utilize differentiating, unknotted, multiplied string in my grasp needle and take a join through the example tissue and the two layers of texture. From an inappropriate side, I return through the texture and example and cut long string tails. Next, I lift the example off the texture, neglecting the tails through. At that point I turn the texture over. With an alternate shading string, I take a second join over every one of the first in a similar manner from an inappropriate side, again leaving long tails. Pull the two texture layers separated, and one set remains sewed to the top texture layer, and the other set remains sewed to the base layer. The strings mark clear situations for my sewing that I can see from the two sides.
— Laurie Wilcox, Palm Desert, California
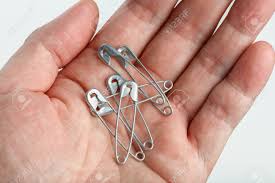
- Two Safety Pins Are Better Than One
At the point when I get flexible or cording through a packaging, I utilize a security pin to help direct it. In case I’m excessively forceful, in any case, the versatile or rope end at the beginning stage can escape from me and sneak into the packaging. It is so hard to “weave” in reverse that I as a rule need to begin once again. Presently, I utilize a subsequent self locking pin to make sure about the flexible or rope tail to the packaging. It holds safely, and I absolutely never need to stress over it incidentally sliding into the packaging.
— Betty Bolden, Bolton, Connecticut
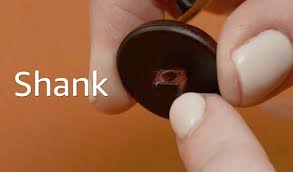
- Make a Button Shank From Thread
To utilize a level catch on thick texture, make a catch shank from string. Start by stringing a needle with a twofold strand of string; hitch the string closes. Take a join on the correct side of the texture, at the catch position mark. This shrouds the bunch under the catch. Take a line through the catch as you ordinarily would, however don’t pull the string tight. Next, pick a spacer to guarantee there is adequate space between the texture and the catch. For slim textures, utilize a straight pin or toothpick. For thicker textures, utilize a hefty darning needle, bobby pin, chopstick, or dainty pen. Addition the spacer under the catch, between the gaps, and afterward pull marginally on the sewing needle to fix the string and secure the spacer. Keep sewing the catch in the typical style. At the point when the catch is sewn safely (with the needle on an inappropriate side of the texture), eliminate the spacer and hold the catch away from the texture, keeping the fastens tight. At that point, bring the needle up between the texture and the catch. Wind the string around the fastens until you’ve made a durable shank. On the off chance that you need to give it a more completed look, especially when you’ve utilized an enormous spacer, make firmly dispersed cover join around the strings rather than essentially winding the string around the shank. At the point when you’ve completed, secure the string near the shank.
5. Outrageous Makeovers
Shop resale or transfer stores for utilized men’s shirts. Remove the collars, sleeves, and sleeves. Open the side creases, and press everything level. Spread out a fundamental pullover design over the rest of the shirt, exploiting existing catch plackets, and some of the time even the sews. I as a rule make a scoop-neck shirt and adjust the neck area as important to utilize the first catch arrangement. I cut off sleeves from the first sleeves and regularly have enough texture left to cut another self-looking for the neck area. Pockets can be repositioned. Contingent upon how the first shirt fits, keep the first shoulders and burden, and simply adjust the neck, sleeves, and length.
— Jane Swanson, Lucca, Italy
- Tape Guide for Topstitching
Sew totally straight topstitching on texture without stamping it by putting veiling tape along the texture to set up a topstitching manual for follow. Simply line along the edge of the tape, and eliminate the tape when you are done.
— Susan Morgan, Salt Lake City, Utah
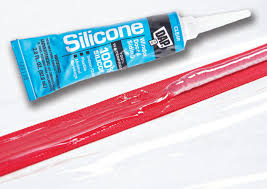
- Silicone Hem Guide
Metal fix guides become excessively hot for my fingers when I am squeezing a stitch. To dispense with this issue, I presently utilize a portion of silicone pot holder. I initially attempted to utilize an entire pot holder by scoring a line denoting the ideal sew profundity, however I inadvertently cut excessively far. That ended up being a surprisingly beneficial development; I chose to cut the remainder of the pot holder into various size stitch guides. One pot holder has given me formats for the entirety of the standard fix sizes I use. My iron doesn’t hurt them, and they generally stay cool to the touch.
— Christianne DeHart, Chico, California
- Keep Disappearing Ink From Vanishing
I was as of late estimating and stamping topstitching lines on a task
utilizing an air-dissolvable, vanishing purple ink checking pen. Time escaped from me, and I understood I needed to leave my sewing space for an arrangement. I didn’t need the imprints to vanish while I was gone, so I applied a piece of Scotch Magic Tape over each imprint. At the point when I came back to my sewing room the following evening, I was excited to discover each imprint as splendid as it had been the day preceding, and the tape pulled off without leaving any buildup. It required some investment to eliminate the tape than it would need to reproduce the imprints, and I had the option to complete the task instantly.
— Norma Bucko, Threads sewer
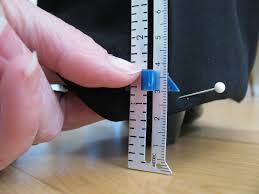
- One-Woman Hem-Marking Device
To stamp a stitch without an assistant, stretch a string tightly over an entryway at the ideal fix stature, and attach or tape it to the pillar on the two sides. At that point dust shower powder onto the string. With the unhemmed article of clothing on, brush delicately against the powdered string, which moves a light cleaning onto the article of clothing at the right stature. Eliminate the piece of clothing and finish the trim. It will be completely corresponding to the floor. This works incredible for skirts, dresses, and covers.
— Bonnie Wheaton, Wheaton, Illinois
- Knit Hook to Remove Basting
I have discovered that utilizing a sew snare works extraordinary to eliminate treating strings, ease sewing strings, and to open creases. I utilize the adjusted highlight push under the join and the snare to eliminate the string. This disposes of the risk of catching the texture’s strings or coincidentally cutting an opening in my texture, the two of which can occur with a crease ripper. I utilize a size 9 snare, yet littler stitch snares work similarly well.
I have a GREAT video on Sewing! CLICK HERE